This was my first attempt at a mini album. I made it for my 2 year old daughter to remember our baking fun when we made her first cupcakes on her 2nd birthday and all of the pancakes she made in the summer of 2011. She loves cooking with mom and these are two of her favorites! It was a lot of fun-and somewhat addicting making the mini album. I used the Scrapping Bug Designs "Baking Beavers" file and "Baking Memories" title. There are some additional pull out journaling tabs and photos in more of the pockets. I found the wonderful red paper bags at the Dollar Tree.
Wednesday, November 30, 2011
Tuesday, November 22, 2011
Hopping Through the Holidays Hop Winner
I used random.org to help me pick a winner. Congratulations to Mary D
Mary D "New follower here and facebook. Love your projects! Thanks for sharing the directions and for a chance to win."
Thank you so much for becoming a new follower. Contact me at tluiz@4fast.net and let me know if you want a fall themed mini book or the one with the "Taste of Christmas" gingerbread men and leave me an address to send it to.
Tammy
Snow Welcome
Just a couple of examples of what you can do with paper piecings in wood. I used my Cricut to cut out some oversized patterns and then cut them out of thin wood. I painted them with acrylic paints, highlighted with my stamps, used vinyl for the words, added wire, and buttons. The smoreman is about 14 inched tall, and the snowman is about 16 inches. I used the "Winter Blessings" and the "Smoremen" files from Scrapping Bug Designs. The wood hanger is a pattern of my own.
Saturday, November 19, 2011
Hopping Through the Holidays Blog Hop, Day 2

Welcome to the "Hopping Through The Holidays" Blog Hop. Come hop along with the design team members of Creative Kuts and Scrapping Bug Designs November 19th and 20th. You will see some awesome projects using both Creative Kuts and Scrapping Bug Designs paper piecing patterns. We’re super excited to be doing this hop together! Our design team members will be showcasing their amazing creations they have created especially for this hop. This hop will feature projects for both Thanksgiving and Christmas. Our intentions of doing this hop is to show each and everyone of you all the wonderful projects you can create using Creative Kuts and Scrapping Bug Designs paper piecings. We hope to give you some great ideas and inspiration through out this amazing blog hop.
Creative Kuts and Scrapping Bug Designs are offering an AMAZING couple of grand prizes also. Creative Kuts will be awarding one lucky winner a $100.00 Cash for their grand prize. Scrapping Bug Designs will be offering one lucky winner a $100.00 in free files. How about that?? Isn’t that awesome!!
To be eligible to win these wonderful grand prizes you MUST:
1) Go through the entire blog hop (both days) and leave a comment on EVERYONE'S post.
2) Become a FOLLOWER of everyone's blog (both days).
3) Visit Creative Kuts Store (you will need to do this to meet the last requirement)
4) Visit Scrapping Bug Designs Store (you will need to do this to meet the last requirement)
5.) At the end of each day you will end at Creative Kuts and Scrapping Bug Designs blogs. You will need to leave them a comment stating you have made it through the entire hop and you will also need to leave in your comment what is your favorite pattern set in their store.
Be sure to hop through the entire hop both days to be eligible for the grand prizes, as well as all the other blog candy throughout! We hope you all enjoy this hop and find a lot of great ideas, inspiration, and most of all have loads of fun!! Here is the link to day one in case you missed hopping on day one.(link Linn's blog http://www.linnsscrapshack.blogspot.com)
Remember you have to hop through both days to be eligible for the grand prizes.
Here is the complete lineup in case you get lost along the way.
1.Kandice: ~ http://www.kreativekandi.blogspot.com
2.Michelle Sheehan ~ http://michelles-scrappy-place.blogspot.com/
3.Tammy Luiz ~ http://scrapnewe.blogspot.com
4.Lisa Peters ~ http://handmadewithlove-lisa.blogspot.com/
5.Fabiola ~ http://www.mrssassycrafter.com
6. Tracey Geneau ~ http://traceyctmh.blogspot.com/
7. Lisa Pontious ~ http://honeybearzdesigns2011.blogspot.com/
8.Lisa Lamer Rhodes ~ http://www.lisakelly110803.blogspot.com
9.Anna Zuniga~http://stampanna.typepad.com/
10. Ginny ~ http://cheezenwhinecrafting.blogspot.com/
11.Gaby B ~ http://www.thecraftydream.blogspot.com
12.Jamie L.~http://myamusinglife.blogspot.com
13. Liz Hagag~ http://scrappinwithstyle.blogspot.com/
14.Janet Royer ~ http://janetscreativeworld.blogspot.com/
15.Creative Kuts Blog ~ www.creativekuts.blogspot.com
16.Scrapping Bug Designs Blog ~ http://scrappingbugdesigns.blogspot.com
Project number one is a fall themed explosion box using SBD "Fall Scarecrow" and "Fabulous Fall" files. It really was simple to figure out.
Explosion Box Directions
Materials
The basic bones of this album is only 4 12x12 sheets of cardstock + embellishments as you desire.
§ 4 Sheets of `12x12 cardstock (the thicker the card the sturdier the box)
§ Paper trimmer or craft knife and metal ruler
§ bone folder
§ Adhesive
§ Pretties...
The box1. Take your 3 sheets of cardstock and trim them to size as per below:
|
2. Now score 4 folds on each card layer as per the measurements and diagram below.
|
| 3. Cut out the corners from all 3 sheets. They should look like this when they are layered on top of each other. |
4. Embellish each of the four side panels on all three sheets as you wish. You may embellish both sides of each panel or just the top sides. Create pockets for tags, photo matts, use quotes, ribbon, brads etc. Adhere the bases together when you have finished embellishing the box. |
The Lid Trim the last piece of cardstock for the lid to 8"x8". Score folds similar to the first sheet above at 2" from each side. Do not cut the corner squares at this stage.Score four more diagonal folds as marked in the diagram below. Fold each corner up and adhere to the side to form the lid. Embellish as desired. |
| **The directions were taken from www.scrapbook-crazy.com |
Project number two is a gift basket with a tin, cookie jar, apron and a recipe booklet.
I used SBD "A Taste of Christmas" and the peppermint candy on the gift tag is from the "Gingerbread House". I used vinyl on the jar and tin; on the tea towel apron, I used fusible web and fabric to make the gingerbread man pocket. The frosting on this gingerbread man only is puffy paint. I found the most adorable recipe cards to put on the inside of this mini "recipe" album that I picked up for a dollar at Walmart.
Thank you all so much for looking at my projects. Be sure to check out my blog to see more altered projects in the week to come. As an incentive to come back, I will offer your choice of a fall (Fall Favorites) or Christmas themed recipe album like the one above.
To be eligible, you must
1. Become a follower only if you want to.
2. Visit my blog www.scrapnewe.blogspot.com again 1 time and leave a comment.
3. Like my Facebook page https://www.facebook.com/Scrapnewedesigns and let me know you've stopped by.
I will draw for my blog candy on Wednesday of next week.
Now hop on over to Lisa's blog: http://handmadewithlove-lisa.blogspot.com/
Monday, November 7, 2011
Just Treats
This is a Halloween layout that I created using Scrapping Bug Designs "No Tricks, Just Treats" paper piecings The fence is from one of SBD border sets and was enlarged to fit the page in SCAL. The cats and pumpkins were so much fun to work with! I added a beaded necklace and a charm pin to one of the ribbons for a little more interest. I completed this layout as a part of a challenge to use up some of our old papers. I've had most of the papers for about 5 years and just kept putting them away every time I got them out for something. It took a while for the layout to come together, but I'm happy with the results.
Sunday, November 6, 2011
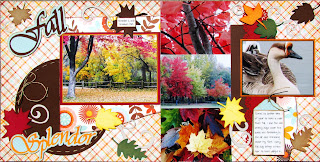
Fall Splendor
I love fall and all of it's colors! I used some Bo Bunny papers in my favorite colors to accent some of my best pictures from last fall. I took the picutres with my 4-H photography group in a local park. There's nothing like a walk in a park on a breezy day in the fall.
Subscribe to:
Posts (Atom)


